
Tall coil-built vessels want to slump, belly out, or crack at the coil joints as they rise. Internal chamfer ribbing, a series of angled ribs worked into the interior wall, stiffens the vessel the way corrugation stiffens cardboard. It is an old hand-building trick that lets you build taller, thinner, and with more confidence.
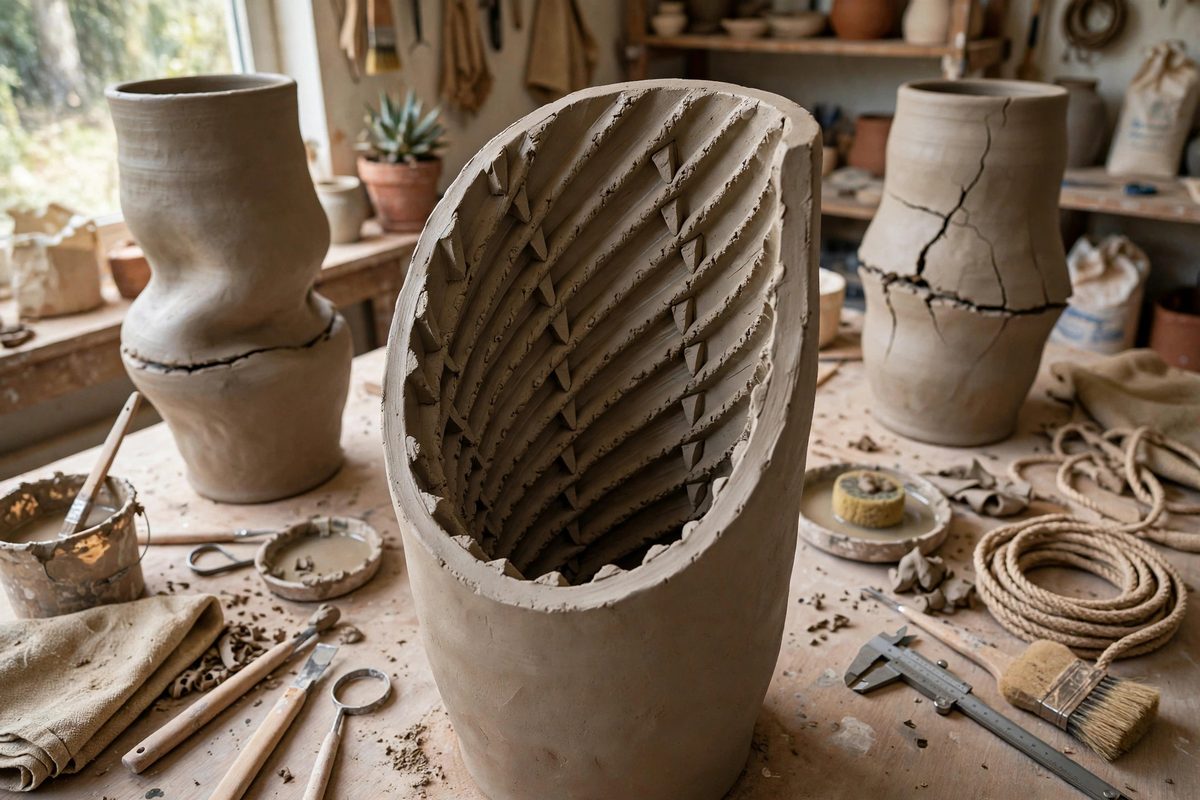
Why Tall Coil Walls Fail
A tall vessel wall is a freestanding column of wet clay. Gravity compresses the lower coils, the wall's own weight makes it want to buckle outward, and each coil joint is a potential shear plane. The taller and thinner the wall, the worse all of this gets. Potters compensate by building slowly, letting sections stiffen before adding more, but patience alone has limits; a very tall vessel needs structural help. Internal ribs change the wall's cross-section from a flat plate, which buckles easily, into a ribbed section with much higher bending stiffness. The ribs do not need to be large to work; even shallow ribbing dramatically increases the wall's resistance to buckling.
Forming the Chamfer Ribs
As you add each coil, work the interior with a rib or your fingers to form a chamfer, an angled facet, along the inside of the wall. The classic approach is a repeating diagonal or horizontal ribbed texture on the interior, with each rib chamfered so it meets the wall at an angle rather than a sharp corner. The chamfer matters: sharp interior corners concentrate stress and invite cracking during drying, while angled transitions distribute it. Blend each coil thoroughly into the one below before ribbing, since the ribs only help if the wall is monolithic; ribbing over poorly joined coils just decorates a weak wall. Keep the exterior smooth and to profile while the interior carries the structure.
Rib Spacing and Depth
Space the ribs roughly one to two wall-thicknesses apart vertically; closer spacing adds stiffness but also adds weight and drying complexity, while wider spacing leaves unsupported spans that can still buckle. The rib depth should be a modest fraction of the wall thickness, enough to change the section's stiffness without creating thick spots that dry slower than the surrounding wall. Consistency matters more than exact dimensions: even, regular ribbing performs better than irregular deep-and-shallow work. On very tall vessels, some builders increase the ribbing slightly in the lower third, where the compressive load is greatest, and ease off toward the rim. This follows the engineering: the bottom carries the most weight.
Drying and Firing Considerations
Ribbed interiors dry differently than smooth ones. The ribs have slightly more mass and slightly less air exposure, so they dry a touch slower than the wall between them; dry the vessel slowly and evenly, covering loosely to equalize. The chamfered transitions help here too, since they avoid the sharp thickness changes that cause differential shrinkage cracks. During firing, the ribs add strength that resists slumping at temperature, which is particularly valuable for tall forms in high fire. The interior texture also gives glazes something to break over beautifully; a ribbed interior with a breaking glaze is a feature, not a compromise. Plan the interior as a visible surface, since anyone picking up the vessel will see it.
Combining Ribbing With Other Strategies
Internal ribbing works best alongside the standard tall-building disciplines: coil and blend thoroughly, build in stages with stiffening pauses, keep the wall thickness even, and support the form if needed. Some potters combine interior ribbing with a slightly thicker lower wall, getting stiffness from both the section shape and the material. Others use ribbing only in the problem zones, like a tall neck or a narrow waist, and leave the rest smooth. There is no rule requiring full-height ribbing; use it where the structure needs it. The technique is a tool, not a style mandate, though many potters come to love the look and use it everywhere.
Chamfer-ribbed interiors turn a flat clay wall into a stiffened structure. Blend the coils, work angled ribs into the interior at even spacing, dry slowly, and build taller than you thought you could. The vessel stands because its walls are engineered, not just hoped.
Related Guides
- Paddle Beating Slabs to Relieve Internal Drying Shear: A clay slab looks uniform but often is not: rolling and handling leave internal stresses, with the top and bottom surfaces compressed differently
- Scoring and Slumping Slab Joints Without Cracking: Slab-built pottery joins flat pieces of clay into three-dimensional forms, and every joint is a potential crack. The joint fails when the two pieces
- Compressing Base Clay to Stop S-Cracks in Pots: S-cracks are the spiral fractures that open in the bottom of thrown pots during drying or firing, shaped like a lazy S across the base. They are not