
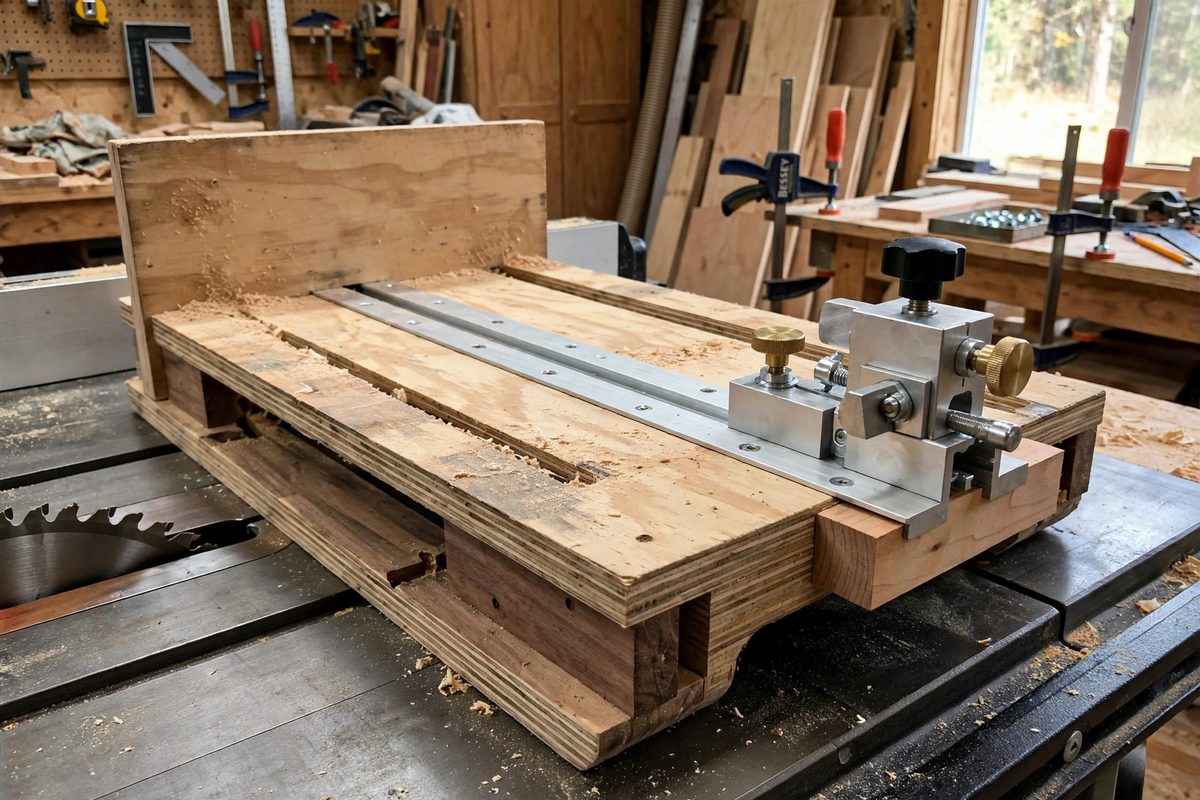
A crosscut sled is only as accurate as its stop block. The sled guarantees a square cut; the stop guarantees the length, and on a good sled the stop needs to hit the same dimension cut after cut, adjustable in increments finer than you can reliably set by eye against a tape measure. Micro-adjustable T-track stops solve this by combining a sliding block that locks anywhere along a T-track with a fine screw adjustment for the last fraction of a millimeter. Build one into your sled and repetitive cuts stop being a test of patience and become a non-event.
Why stops need micro-adjustment
Woodworking tolerances stack. A stop set by eye to a pencil mark might be off by a quarter millimeter, and across four table legs that error doubles into a visible wobble. Tape measures themselves have end-play that exceeds fine woodworking tolerances. A micro-adjustable stop sidesteps all of this: you set the block coarsely near the dimension, lock it, then dial the fine screw while measuring the actual cut until the dimension is exact. From then on, every workpiece registered against the stop comes out at that dimension regardless of tape measures, pencil marks, or eyesight. The micro-adjuster also makes it practical to sneak up on a fit, trimming a tenon shoulder by a hair without resetting the whole stop. Once you have cut with one, a plain clamped block feels like a blunt instrument.
Anatomy of the stop
The stop has three functional parts. The slider rides in the T-track and carries a locking mechanism, usually a knob driving a bolt whose head engages the track slot; when tightened, it wedges the slider immovably. The stop face is the surface the workpiece registers against; it must be flat, square to the sled's fence, and tall enough to support the workpiece without tipping. Between them sits the micro-adjuster: a threaded screw, typically a fine-pitch machine screw or a dedicated adjuster, that moves the stop face relative to the slider over a range of a few millimeters. Turning the screw walks the face in or out by a known amount per revolution, which is what makes the adjustment truly micro rather than merely fiddly. A lock for the adjuster screw itself prevents vibration from walking the setting during a cutting session.
Building the slider and track fit
The slider must fit the T-track with no slop but free movement: too tight and it binds, too loose and the stop face shifts under cutting pressure. Mill or carefully fit the slider to the actual track, testing the fit along the full length since tracks vary. Hardwood sliders work and are easy to make; UHMW plastic or aluminum sliders glide better and wear longer. The locking bolt should pull the slider down and slightly sideways into the track walls, wedging it solid; a bolt that only pulls straight down can still allow lateral creep. Test the locked slider by pushing the stop face hard from the cutting direction. Any movement at all is unacceptable, because cutting force will find it on every pass. This test, done honestly, separates stops that hold from stops that merely look like they hold.
The micro-adjust mechanism
The adjuster screw wants fine pitch and smooth action. A standard coarse thread moves too far per turn for delicate work; a fine machine screw gives controllable increments, and a longer screw with a comfortable knob gives the leverage to turn it precisely. Mount the screw so its axis is parallel to the direction of adjustment and its thrust bears on a solid surface, not on end grain that will dent and introduce slop over time. A small metal wear plate where the screw bears is cheap insurance. Provide a positive stop at both ends of the adjustment range so the screw cannot be run out of its nut mid-job. After dialing in a setting, lock the screw; the vibration of repeated cuts will otherwise migrate it, and the drift will show up as a slow creep in your cut lengths that is maddening to diagnose.
Calibrating to the blade
A stop measures from the blade, so calibration means establishing the exact relationship between the stop face and the cut line. Set the stop coarsely, make a test cut in scrap, measure the result with calipers, and dial the micro-adjuster by the difference. Cut again and verify. Two iterations usually nail it. Record the setting if your stop has a scale, but treat the scale as a return-to reference rather than an absolute measurement; the final authority is always a test cut. Recalibrate whenever anything in the chain changes: a different blade, a freshly squared fence, or the sled itself being disassembled. The micro-adjuster makes recalibration a two-minute job instead of a reason to avoid it.
Using the stop well
Good stops still need good technique. Hold the workpiece firmly against both the fence and the stop face during the cut; a workpiece that lifts or shifts between the stop and the blade cuts long. Clear sawdust from the stop face between cuts, since a crumb of dust is a measurable error at fine tolerances. For very small parts, consider a sacrificial auxiliary face that can be cut into, keeping fingers away from the blade while maintaining registration. And respect the obvious: the stop is for crosscutting on the sled, with the blade guarded and the workpiece controlled. Precision is no excuse for casual safety.
A micro-adjustable T-track stop turns your sled from a square-cutting jig into a dimension-holding machine. Build the slider slop-free, give the adjuster fine threads and a lock, calibrate with test cuts, and keep the stop face clean. Repetitive accuracy stops being luck and starts being procedure.
Related Guides
- Zero Clearance Insert Tolerances on Saws: A zero-clearance insert is the throat plate with a slot cut by the blade itself, so the opening matches the blade exactly and the workpiece is
- Dovetail Router Jig Finger Offset Spacing Precision: A dovetail router jig cuts both sides of the joint, tails and pins, using a template with fingers that guide the router. The critical dimension is
- Balancing Flywheel Weight in Custom Hand Crank Jigs: A hand-cranked jig with the right flywheel feels like it powers itself: one push and it carries smoothly through the hard part of the stroke. The
- Dial Indicator Calibration on Table Saw Miter Fences: A miter fence that is off by half a degree will ruin a picture frame, a segmented turning, or any joint where small errors multiply across multiple