
A 3D-printed mallet head takes impacts for a living, and impact is the cruelest load you can ask of a layered plastic part. The difference between a mallet head that dead-blows for years and one that splits on the third strike comes down to how you balance perimeter walls against infill. Get the ratio right and the part behaves like a solid chunk of plastic; get it wrong and the infill collapses under the first hard blow.
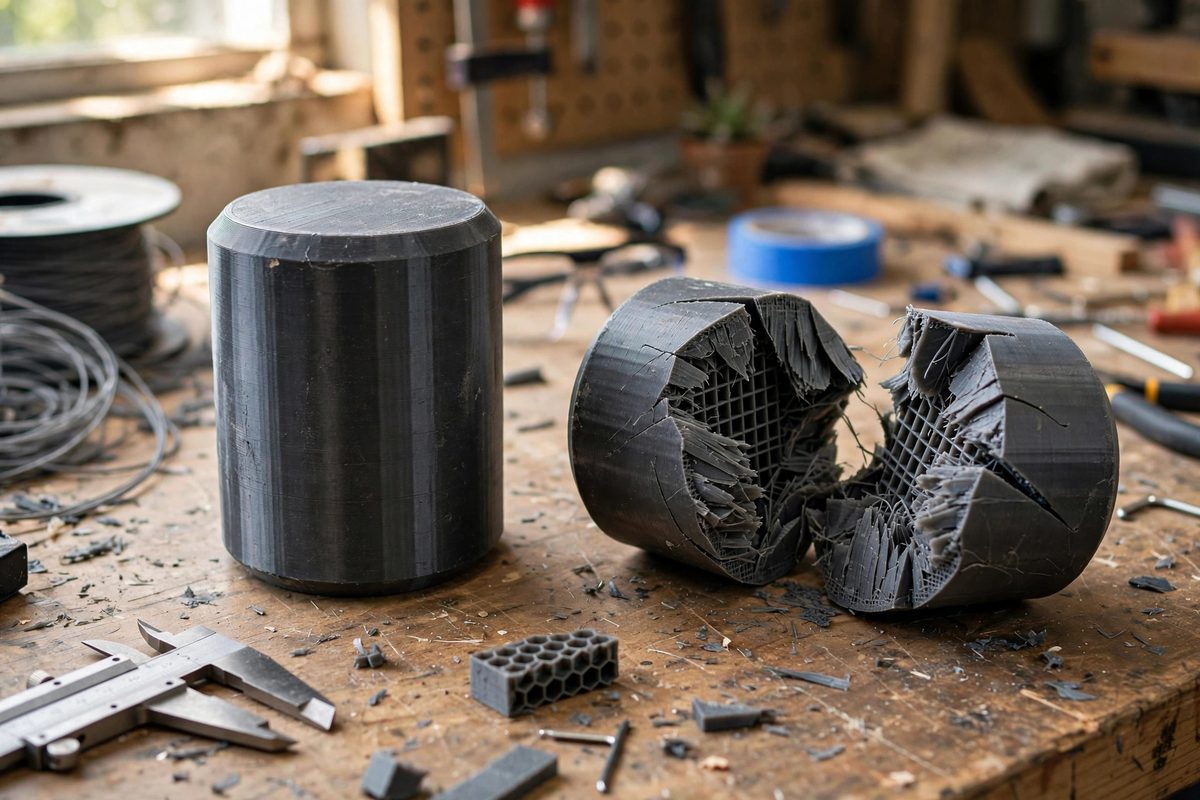
Perimeters Carry the Blow
In a printed part under impact, the perimeter walls do the structural work. They are continuous extrusions, bonded layer to layer, and they resist the hoop stress when the mallet face mushrooms against a chisel. Infill, by contrast, is a lattice that mostly keeps the walls from buckling inward; it contributes far less strength per gram. For mallet heads, start with 6 to 8 perimeters (roughly 2.5 to 3.5 mm of wall with a standard 0.4 mm nozzle). Below 4 perimeters, the striking face cracks along the layer lines almost immediately.
Infill: Dense Enough to Support, Not Solid
Full solid infill is tempting but wasteful: it prints forever, adds weight you do not want swinging, and traps heat during long prints. A rectilinear or grid infill at 40 to 60 percent gives the walls the backing they need without the penalties. The key detail is infill overlap: bump the infill-to-wall overlap slightly above the slicer default so the lattice bonds firmly to the perimeters, because an infill grid that detaches from the wall under impact might as well not exist. Gyroid infill at similar density also works and distributes impact loads more evenly, at the cost of longer print times.
The Strike Face Deserves Special Treatment
The face that meets the chisel takes the worst punishment, and printed layer lines there are a liability. Two strategies help. First, print the head so the strike face is on the build plate or the top surface, where the layer plane runs across the face rather than through it, so impacts compress layers instead of splitting them. Second, consider a replaceable face insert: a thicker solid section, or even a bolted-on face of a tougher material, turns the highest-wear zone into a consumable. A mallet with a replaceable face never becomes trash.
Material Choice Multiplies the Geometry
Walls and infill matter, but the filament sets the ceiling. PETG and ASA survive impacts far better than PLA, which is brittle under shock no matter how many perimeters you stack. For a dead-blow feel, some makers pour the head partially full of steel shot or sand and seal it; the loose mass absorbs rebound and makes each strike land harder and quieter. If you do this, print the cavity walls extra thick and seal the fill hole with a printed plug plus adhesive, because loose shot escaping through a cracked seam is a mess and a hazard.
Handle Socket Integration
The handle socket is the mallet's second failure point. Print it with walls as thick as the head itself, and give the socket generous fillets where it meets the head, because sharp internal corners concentrate the prying stress every time the mallet strikes off-center. An oval or rectangular socket matched to the handle cross-section resists twisting better than a round one. Epoxy the handle in rather than relying on a friction fit; a handle that loosens mid-swing turns the mallet head into a projectile.
Test Before You Trust
Before the mallet goes into service, strike it against a block of hardwood a dozen times, escalating force, and inspect for white stress marks or delamination at the face and socket. White marks are the plastic telling you it is about to fail; redesign with more perimeters or a tougher filament before the part sees real work. A printed mallet will never match a solid wood or rawhide head for a lifetime of service, but built this way it is a genuinely useful shop tool, not a novelty.
Tough printed mallets come from thick perimeters, supportive but not solid infill, smart face orientation, and a socket built like it means it. Print to that formula, test it hard, and the mallet on your bench will earn its place.
Related Guides
- Optimizing Perimeter Wall Thickness for Tough Tool Racks: A printed tool rack holds real weight: chisels, wrenches, and drivers hanging off hooks and slots, loaded and unloaded daily. The perimeter walls
- Print Infill Geometry for Impact-Resistant Mallets: A 3D-printed mallet is a real tool if it is built like one. The head must absorb repeated impacts without delaminating, cracking, or shattering, and
- Shell Thickness Optimization for Tough Impact Wrenches: An impact wrench housing printed in PLA that cracks after twenty bolts is not a failed design, it is a failed thickness decision. The shell of a
- Print the NASA Ratcheting Wrench from Space: The First Tool "Emailed" to Space! In 2014, NASA made history by transmitting a 3D model file from Earth to the International Space Station, where
- Print Orientation for Shear Strength on Shop Wrenches: A 3D-printed wrench is a study in compromise: enormously useful for odd sizes, custom clearances, and non-marring work, but built from a material