
Composite fascia looks crisp on day one and hides a slow problem behind it. Water running off the deck surface finds its way behind the fascia board, sits against the rim joist, and starts the long, quiet work of rot. The rim joist is structural; the fascia is cosmetic. When the cosmetic board traps water against the structural one, the deck's lifespan is being spent invisibly. Proper flashing between the rim joist and the composite fascia is a small detail installed in an afternoon that prevents a structural repair years later. This guide covers the water path, the flashing detail, and the installation sequence that keeps the rim dry.
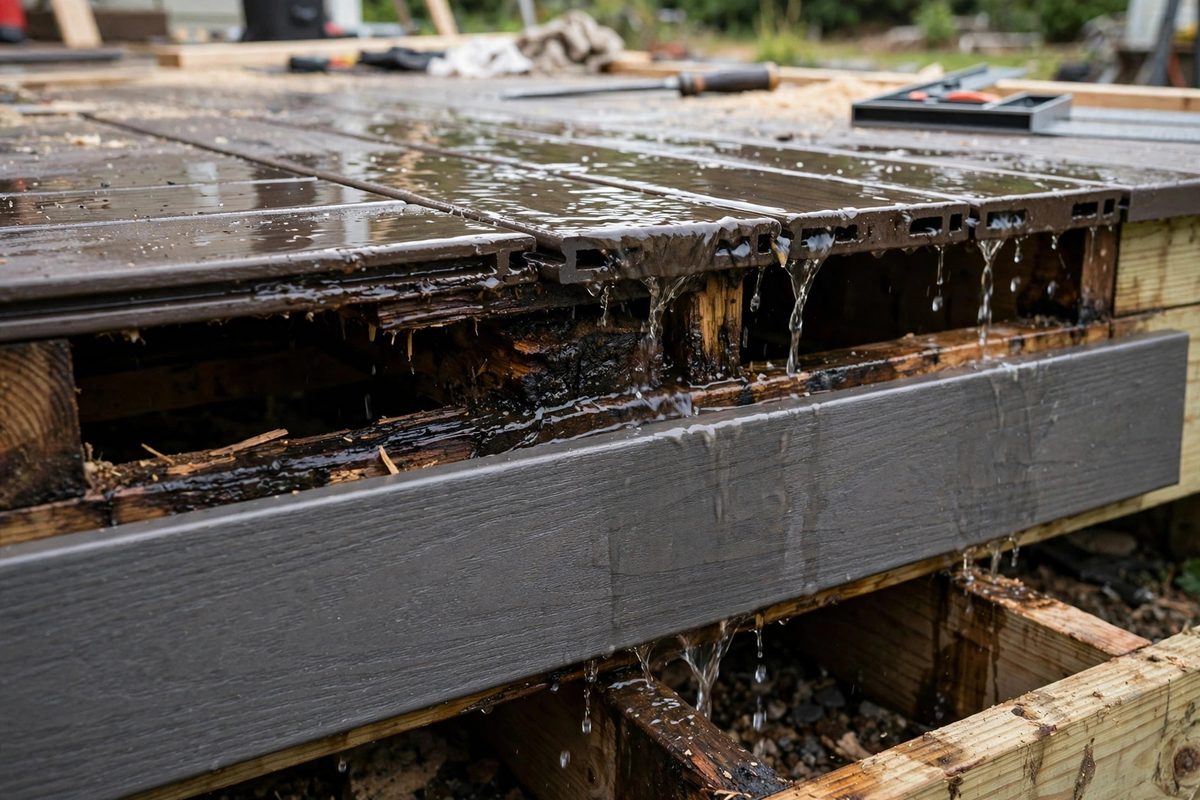
How water gets behind the fascia
Deck water does not politely drip off the edge. Wind drives rain sideways under the lip of the fascia, deck boards cup and channel water toward the rim, and capillary action pulls moisture into every tight joint. Composite fascia, being dimensionally stable and nonabsorbent, does not wick water away or dry quickly the way wood does; instead it holds a damp microclimate against whatever is behind it. The rim joist behind it is usually pressure-treated lumber, which resists rot but does not resist it forever under constant wetting. The failure mode is slow: years of damp cycles soften the outer fibers, fasteners lose grip, and eventually the rim that the railing posts and stair stringers depend on is compromised. By the time it is visible, the repair involves removing the fascia, the deck boards along the edge, and often the railing.
The flashing principle
Flashing works by giving water a preferred path that leads away from the structure. The detail here is a metal flashing, typically a corrosion-resistant coil stock, that laps over the top of the rim joist and extends down behind the fascia, so any water entering from above is caught and directed outward, never touching the rim. The critical geometry is the lap: the flashing must start above the water entry point and end below it, with gravity doing the work the whole way. Think shingles: every layer sheds onto the layer below. Any place where the flashing terminates behind the fascia instead of in front of it, or where a joint laps the wrong direction, becomes a funnel instead of a shield. Draw the water path on paper before cutting metal; if you cannot trace a continuous downhill route from entry to exit, the detail is wrong.
Installation sequence
Install the flashing before the fascia goes on, obviously, but the sequencing with the deck boards matters too. With the rim joist exposed, inspect it and let it dry if the framing is new and wet. Cut the flashing to run the full length of the rim in as few pieces as possible, since every seam is a potential leak. The top leg of the flashing should tuck under the deck boards or under the drip edge at the deck surface, extending down the face of the rim by several inches. Fasten the top leg where the deck boards will cover the fasteners, keeping penetrations out of the water-shedding face. Lap seams in the direction of water flow by several inches and seal them with a compatible sealant, not as the primary defense but as backup. Then install the fascia over the flashing with the manufacturer's recommended gap at the bottom for drainage and ventilation.
Fascia fastening and ventilation
Composite fascia needs room to move and air to dry. Fasten it with the correct fasteners at the correct spacing, keeping the bottom edge held slightly off the flashing or the structure so water can drain and air can circulate. A fascia board screwed tight against the flashing with no drainage gap recreates the trapped-moisture problem the flashing was meant to solve, just one layer out. Leave the manufacturer's recommended expansion gaps at butt joints and cover them with the appropriate trim or leave them as designed; a joint that is forced tight will buckle, opening a water entry that dwarfs the original concern. The assembly should read as a rainscreen: an outer cosmetic layer, a drainage space, and a flashed structural layer, each doing its own job.
Material compatibility
Flashing metal and fasteners must get along with pressure-treated lumber and with each other. Modern treated lumber is corrosive to some metals, so use flashing and fasteners rated for contact with treated wood; aluminum flashing in direct contact with certain treatments is a known bad combination. Keep dissimilar metals separated where they would otherwise touch in the presence of water, since galvanic corrosion works just as well on a deck as it does on a boat. Sealants should be compatible with both the flashing and the composite fascia, because a sealant that attacks the fascia's surface creates a maintenance problem of its own. When in doubt, check the manufacturers' compatibility guidance rather than improvising.
Inspection and maintenance
The flashing detail is not install-and-forget. Inspect the fascia bottom edge and the drainage gap annually, clearing the debris, leaves, and dirt that accumulate and hold moisture against the assembly. Check that the fascia has not shifted to close the ventilation gap and that sealant at seams is still intact. Probe the bottom of the rim joist from behind or below where accessible; soft wood at the bottom edge is the early warning. Catching a flashing failure at the inspection stage is a recaulking job. Catching it at the rot stage is a rebuild.
Water always finds the unflashed joint, so flash the joint. Lap metal over the rim joist and down behind the composite fascia, keep the drainage path open, use compatible materials, and inspect yearly. It is an afternoon of work that protects the most structurally important board on the deck's perimeter.
Related Guides
- Fastener Corrosion Limits in Pressure-Treated Rim Sills: Pressure-treated lumber protects against rot and insects, but the preservative chemicals that do the protecting are corrosive to steel fasteners. The
- Ledger Board Fastener Shear Load Spacing: A deck ledger is the board bolted to the house that carries half the deck's weight, and its fasteners carry that weight in shear while resisting the
- Post-to-Beam Knee Bracing for Lateral Sway Limits: A deck's posts and beams handle vertical loads naturally, but lateral loads, wind, foot traffic shifting, the occasional enthusiastic gathering, push
- Stair Stringer Throat Depth for Exterior Landings: Cut stringers are the backbone of most exterior stairs, and the weakest point of every cut stringer is the throat: the thinnest section of wood left