
Pre-catalyzed lacquer is the finish of choice when you want durability with a fast build, but straight off the gun it usually carries a fine orange-peel texture that keeps it from looking truly premium. The path from that slightly pebbled surface to a mirror gloss is wet sanding: leveling the finish with ultra-fine abrasives under water, then polishing the haze back to clarity. It is slow, methodical work, and it is the difference between a finish that looks good and a finish that looks like glass. The technique rewards patience and punishes rushing in very specific ways.
Building enough finish to sand
You cannot level a finish that is not there. Wet sanding removes material, so the coating must be built thick enough to survive leveling with a safe margin above the wood. Plan on several full coats beyond what looks adequate, applied per the manufacturer's schedule, and then let the finish cure fully before touching it with abrasive. Pre-catalyzed lacquer continues to harden after it feels dry, and sanding too early gums the paper and leaves a finish that never quite reaches full hardness. When in doubt, wait longer. A finish sanded a week after spraying behaves noticeably better than one sanded the next day, because the film has shrunk, hardened, and stabilized. The waiting is part of the process, not dead time.
Grit progression and the leveling stage
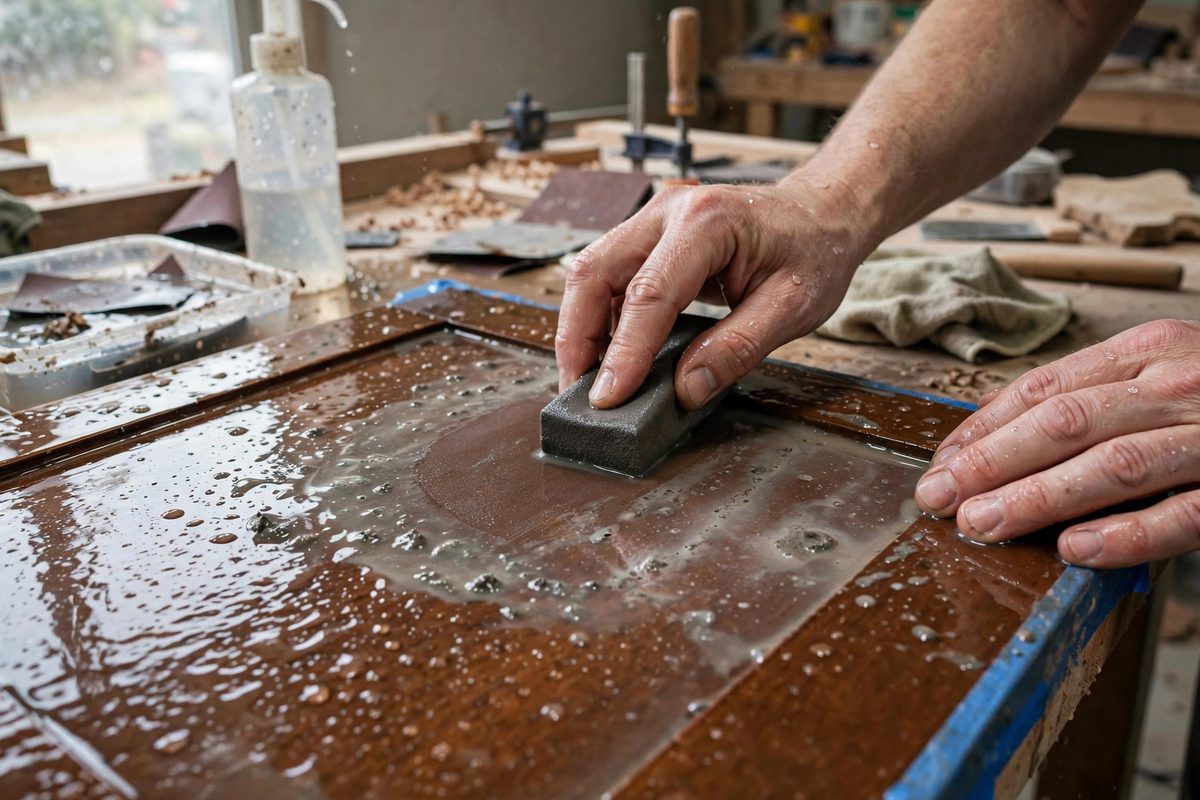
Start leveling with an abrasive fine enough not to cut through: for most lacquer work that means beginning around eight hundred to one thousand grit, used wet with a flat, firm sanding block. The water serves three purposes: it lubricates, it carries away the sanding residue that would otherwise clog the paper and scratch, and it keeps the work cool. Sand in straight, overlapping passes with light, even pressure, and watch the surface under a raking light. The orange peel shows as shiny low spots amid the sanded matte; you are done with a grit when those shiny spots are gone and the whole surface is uniformly dull. That uniform dullness is success, not a problem. Move up through the grits, roughly doubling the fineness each step, and do not skip: each grit's job is to remove the scratches of the previous one, and a skipped grit leaves deep marks that the finer paper cannot efficiently erase.
The critical danger: sanding through
Every coat of finish has edges and high spots where the film is thinnest, and those are where sand-throughs happen. Ease off pressure near edges, corners, and any raised detail, and consider masking or simply avoiding the very edge until the final grits. If you break through to wood or to a stain layer, there is no local fix that looks right; the honest repair is to re-coat the area and start the leveling again after curing. Check your progress constantly under raking light, and learn to read the changing appearance of the sanded surface. A spot that suddenly looks different in color or texture is telling you the film is getting thin there. Stop, evaluate, and if in doubt, stop sanding that area entirely. A slightly imperfect level is invisible. A sand-through is forever.
Polishing from haze to mirror
After the finest sanding grit, the surface is perfectly flat and perfectly hazy. Polishing restores the clarity in stages: a cutting compound on a foam pad removes the final sanding marks, followed by progressively finer polishes until the surface reflects cleanly. Work the compounds the way you worked the sandpaper, in overlapping passes with moderate pressure, and wipe down between stages to inspect. The transformation happens gradually and then suddenly: at some point the haze gives way and the reflection snaps into focus. Machine polishing with a random-orbit polisher speeds the work enormously on large flat surfaces, but keep the pad flat and the machine moving, because heat and edge pressure can burn through a finish just as surely as sandpaper. Hand polishing remains the safer choice near edges and details.
Contamination control
A mirror finish shows everything, including the dust nib you sanded around instead of removing and the silicone fingerprint that fisheyed the third coat. Wet sanding forgives some sins by leveling dust nibs out of the film, but contamination under the finish is permanent. Keep the polishing area clean, change the rinse water when it gets milky, and keep silicone-containing products far from the finishing area; silicone contamination causes fisheyes that no amount of sanding fixes. Between grits, wipe the surface clean so a stray coarse particle does not get carried into the fine work. The final polish deserves fresh pads and clean compounds, because a contaminated pad will install swirl marks faster than the compound removes them.
Health and safety
Wet sanding keeps dust down but does not eliminate exposure. Lacquer dust and polishing compounds still reach the air, so wear a respirator rated for the particulates involved, not just a dust mask. The solvents in lacquer and in some compounds demand ventilation and freedom from ignition sources during spraying and for a good while after. Dispose of solvent-soaked rags safely, since some finishing rags can self-heat; the metal container with a lid exists for a reason. Wet sanding is the safe end of the finishing process, but only if the spraying that preceded it was handled with proper precautions.
Mirror lacquer is a sequence, not a trick: build the film generously, cure it fully, level it through a complete grit progression, and polish the haze back to glass. Respect the thin spots, keep everything clean, and let each stage finish its job before moving on. The reflection at the end is the receipt for the patience.
Related Guides
- Hardwax Oil Penetration on Dense Hardwoods: Hardwax oils promise the best of both worlds: the natural look and repairability of an oil with the protection of a wax film. On dense hardwoods like
- Film Thickness Control in Sprayed Conversion Varnish: Conversion varnish, the catalyzed finish of professional cabinetry, earns its reputation for hardness and chemical resistance only when applied at
- Buffing Polyurethane Coats With Pumice and Rottenstone: Brushed polyurethane almost never dries into the flawless surface you want. There are always brush marks, dust nibs, and orange peel to deal with
- Spray Viscosity Tuning for Two-Part Polyurethane Coats: Two-part polyurethane lays down a hard, chemical-resistant film that furniture makers love, but it only sprays well within a narrow viscosity window