
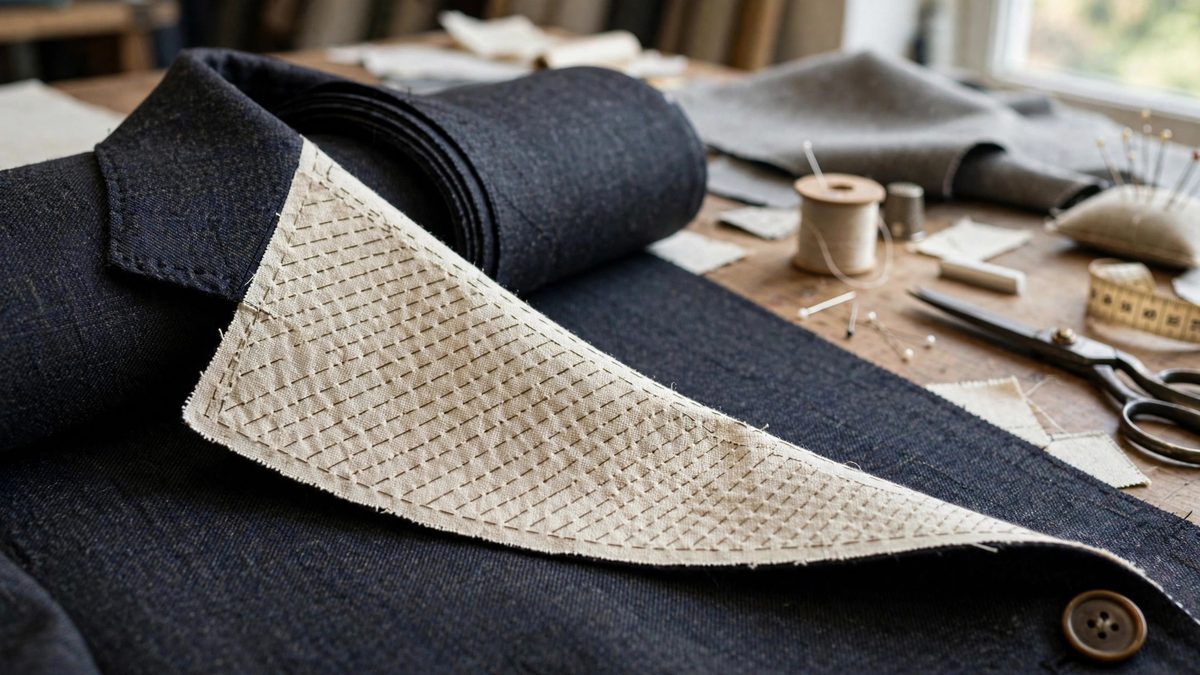
The rolled lapel of a tailored jacket, curving smoothly from the collar to the button, holds its shape because of pad stitching: rows of small diagonal stitches that laminate the canvas interfacing to the garment cloth and mold the two into a three-dimensional roll. The density of that stitching, how close the rows sit and how long each stitch runs, is the tailor's primary control over the lapel's character. Dense stitching makes a firm, crisp roll that holds its line aggressively; open stitching makes a softer roll with more drape. Getting the density right for the cloth and the design is one of the quiet skills that separates tailored from merely sewn.
What pad stitching does structurally
Pad stitching joins the interfacing canvas to the outer cloth with thousands of small stitches that do more than attach: they shape. Each stitch draws the two layers together at a point, and the accumulation of these points across the lapel area forces the layers into conformity, creating the smooth compound curve of the roll. The stitching also stabilizes the bias: lapel areas are cut on varying grains, and the pad stitching locks the cloth's stretch, preventing the lapel from growing and distorting with wear. Without pad stitching, a lapel is two flat layers that wrinkle independently; with it, they become a single molded structure. The density of the stitching sets how completely this transformation occurs and how firmly the resulting shape holds.
Density and the character of the roll
Stitch density operates on two axes: the spacing between rows and the length of the individual stitches. Close rows with short stitches produce the firmest result, appropriate for structured shoulders, heavy cloths, and military-crisp lapels that must hold a sharp line. Wider spacing with longer stitches gives a softer, more relaxed roll suited to unstructured jackets and fluid fabrics. The classic tailoring density, rows roughly a quarter to three-eighths of an inch apart with stitches of similar length, suits medium-weight suiting and produces the versatile roll most jackets want. Adjust from this baseline by cloth and design: heavier cloth needs denser stitching to control it, while very dense stitching on a light cloth makes the lapel board-like and kills the drape. The density should disappear into the result; visible stiffness means too much, a lapel that will not hold its roll means too little.
Shaping the roll with stitch placement
Density is not uniform across the lapel; the skilled tailor varies it to shape the roll. The break line, where the lapel folds, wants the firmest stitching, since this crease defines the lapel's geometry; work the rows slightly closer through the break. The belly of the lapel, the curved area between the break and the edge, wants even, moderate density that molds the smooth curve. Toward the gorge and the collar, the stitching transitions into the collar's own pad stitching, which is typically denser to support the collar's stand. This graduated density sculpts the lapel in three dimensions the way a potter's fingers shape clay: the variation is the shaping. Mark the break line and the roll line on the canvas before stitching, and let the marks guide the density changes.
Working the stitches well
Pad stitches are small diagonal stitches worked through the canvas, catching just a thread or two of the outer cloth so nothing shows on the face. The classic technique works with the cloth side down, feeling for the right bite by touch; the stitches should be invisible from the outside, and any stitch that shows is too deep and must be redone. Keep the rows straight and parallel, following the lapel's geometry; wandering rows create uneven shaping that pressing cannot fix. Maintain consistent tension: the stitches should draw the layers together firmly without puckering. This is slow work, hundreds of stitches per lapel, and the rhythm matters; experienced tailors describe falling into a cadence where the hand knows the spacing. Embrace the slowness. The lapel will be handled and looked at for the life of the garment.
Pressing and the finished roll
Pad stitching and pressing are partners: the stitching creates the shape, the pressing sets it. After stitching, mold the lapel over a tailor's ham or a sleeve board, applying steam and pressure to establish the roll, then let it cool completely in position; the cooling under tension is what sets the memory into the cloth and canvas. Press from the canvas side to avoid crushing the outer cloth's finish, using a press cloth always. The finished lapel should roll smoothly with no crease except at the intentional break, spring back when flexed, and lie naturally without being forced. If the roll collapses, the stitching was too open or the pressing too timid; if it stands rigid, the stitching was too dense for the cloth. Adjust the next lapel accordingly, since the two lapels of a jacket must match.
Matching and mastery
The two lapels, and the collar, must agree in density and character; a jacket with one crisp lapel and one soft one looks broken. Work both lapels in the same session with the same rhythm, checking them against each other as you go. Keep notes on the density used for each cloth weight, building a personal reference that makes future jackets faster. Pad stitching density is one of those tailoring variables that is learned in the hands over many garments; the first lapels teach the mechanics, the later ones teach the judgment. The goal is a lapel whose roll looks inevitable, as if the cloth simply wanted to curve that way, which is the highest compliment the invisible stitching can earn.
Set pad stitching density to the cloth and the design: firm and close for structure, open for drape, graduated through the break and belly to sculpt the roll. Stitch invisibly, press decisively, match the pair. The lapel's elegant curve is just density, well judged.
Related Guides
- Horsehair Canvas Pad Stitching for Tailored Lapels: The difference between a jacket that looks expensive and one that looks homemade is often invisible: it is the interlining inside the lapel
- Canvas Chest Piece Pad Stitching for Structured Lapels: Pad stitching is the handwork that gives a tailored lapel its roll, its shape, and its quiet refusal to lie flat or bubble. It joins the canvas chest
- Steam Shaping Wool Canvas for Suit Collars: A suit collar does not get its elegant roll from cutting alone; it is shaped. Wool canvas, the traditional chest interfacing, can be shrunk and
- Haircloth Chest Canvas Molding for Structured Overcoats: The chest of a structured overcoat holds its shape because of what is inside it, not because of the outer fabric. Haircloth chest canvas, the stiff